The first card announces the color — the kind of equipment for which the ballistics data are valid.
Weapon: the magnificent Carabiner 31. The data are not valid, for example, for the Stgw 57, and will be more or less incorrect for rifles with barrel lengths other than the K31’s 652 mm.
Cartridge: Cart. 7.5 mm 11, the ordnance GP11. Other 7.5x55mm cartridges exist on the market, but the difference in ballistics may become significant already at medium shooting distances.
Adjustment in drift and elevation: 0.1 mrad per click. Most modern armies have adopted this click value for the scopes used on sniper rifles, and there is a very good reason for that: calculations are greatly simplified. With this value, 1 click at distance D moves the point of impact by D/10’000, which corresponds to 0.25 cm at 25 m, 1 cm at 100 m, 4 cm at 400 m, 6.85 cm at 685 m, etc. If the turrets of your scope are graduated in fractions of MOA or other “inches per 100 yards”, our range cards will not be of any use to you.
Be careful: “to trust is good, to verify is better”. Even among reputable manufacturers, there is sometimes up to 5% discrepancy between the advertised click value and the actual value. (Low-end glasses can have up to 20% of error!) It is always a good idea to check the click value of your scope (e.g. shoot a group at 25 m, make +100 clicks in elevation, and shoot another group – the second group should be 100 x 0.25 = 25 cm higher). 5% error may seem small, but at long rage it can very well be the difference between a hit and a miss. (And since you’re there, check the return to zero as well, +100 clicks then -100 clicks must end up at the starting point. And since you’re there, make sure that the point of aim does not move with changes in zoom.)
Sight height of 7 cm. This height (also called “inter-axis”) is measured between the axis of the barrel and the central axis of the scope’s optics. The 7 cm correspond to a typical k31.ch chassis setup with a standard AR-15 / M4 mount height (34-37 mm optical axis above the Picatinny rail). The rangecards data is still valid (within 1 click) for sight heights between 6.5 and 7.5 cm.
Zero (point of aim = point of impact) at 100m. In practice, it is not necessary to be at a 100m shooting range to zero your equipment. You can very well do it at 25, 50 or 300 m, and then adjust your scope to bring the zeroing angle to the necessary value. For example, for a weapon zeroed at 25 m (point of aim = point of impact) it would be necessary to decrease the elevation by 15 clicks (see the “25 m” card). For a 50 m zero, you have to go down 3 clicks.
Warning: zeroing at short distance (especially 25 m, but also 50 m) is very sensitive to the height of the optical axis. If your scope is mounted with a sight height other than 7 cm, for a perfect zero the difference must be taken into account. Here is the procedure to follow, taking as an example zeroing at 25 m:
1. Zero “point of aim = point of impact” at 25 m.
2. Lower the point of impact by 15 clicks (see the “25 m” card) to compensate for the difference in elevations between 25 and 100 m.
3. Compensate for difference in sight height in clicks. For example, a sight height of 6.5 cm is 0.5 cm lower than the reference 7 cm. To compensate, it is necessary to raise the point of impact by 0.5 cm. At 25 m, one click corresponds to 0.25 cm. We must go up 2 clicks.
At 50 m, 1 click = 0.5 cm; to compensate for the difference of between-axis at this distance it would be enough to raise the point of impact by one click.
Naturally,to compensate for a scope, which is mounted higher than the reference 7 cm, it is necessary to go down with the point of impact, rather than go up.
Once your rifle is zeroed, the range cards give you the corrections to introduce to your scope depending on the distance to the target and the atmospheric conditions.
All corrections are given in 0.1 mrad clicks.
Explanation by example: shooting on a target at 925 m with an angle of aim of 10 ° in the mountains at 1500m altitude by 20°C temperature with a 5 m/s wind from 10h.
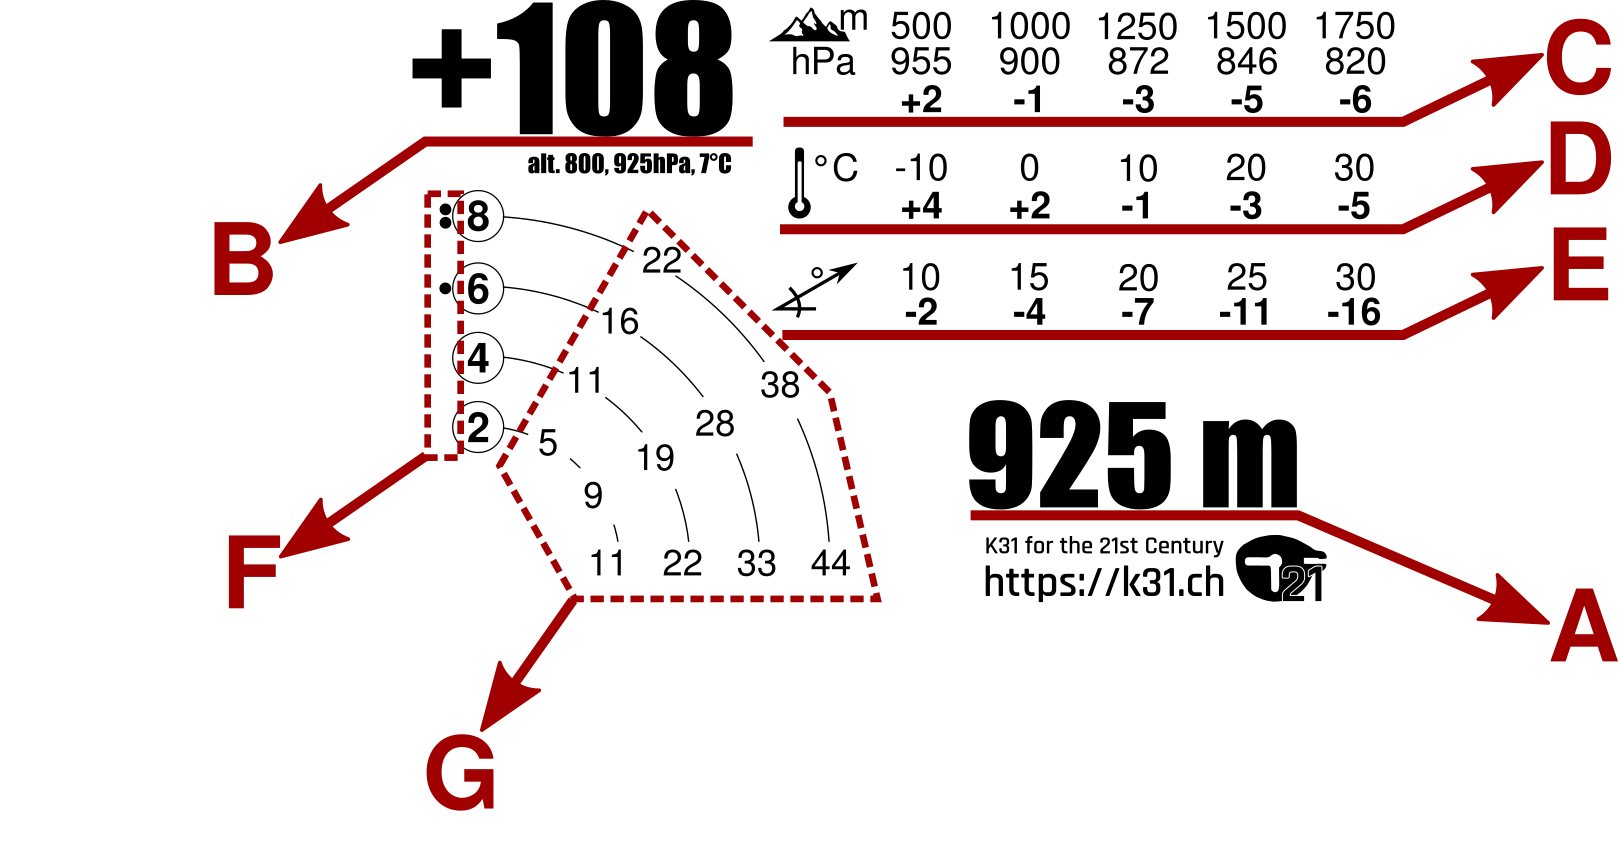
A: Distance to the target, in this example – 925 m. All data on the card corresponds to this distance. If the distance to your target lies between two cards, you must estimate the corrections by averaging between two values.
Warning! This is the linear distance in a straight line between the muzzle and the target. In the case of inclined fire, where the goal is higher or lower than the shooter, it is not the same as the horizontal distance (for example, measured on a map).
B: Number of clicks in elevation to be entered for this distance, in this example +108 clicks. This correction corresponds to flat fire under average Swiss conditions (altitude 800 m, atmospheric pressure 926 hPa, temperature 7°C). All other elevation values on the card represent corrections to be made to that number based on firing conditions.
C: Altitude / atmospheric pressure. The first row represents altitude above sea level. In this example, for shooting at alt. 1500 m, it is necessary to remove 5 clicks of elevation, because with altitude the atmospheric pressure decreases, and the bullet encounters less resistance of the air on the trajectory. The elevation would be +108-5 = 103 clicks.
The second row represents the atmospheric pressure scale in hPa (hPa = millibar = mbar). If you have a barometer, ignore the first line (altitude) and use the effective pressure – it is more accurate to actually measure the pressure, than to estimate it from the altitude.
Warning! Take absolute pressure at the station! The common mistake is to use the reduced relative pressure at sea level (which is usually in the 1000-1025 hPa range). If you see a number of more than 1000 hPa in the mountains at 1500m altitude, either you are reading the relative pressure instead of the absolute (mistake!), or the end of the world is even closer than expected.
D: Temperature. As the temperature increases, the initial velocity of the projectile increases and the resistance of the air decreases. Both factors cause the trajectory to pass higher (therefore it is necessary to introduce less elevation). In our example, for 20°C the correction is -3 clicks, which makes a total of +108 -5 (alt./pressure) -3 (temperature) = 100 clicks.
Warning! The numbers correspond to both the air temperature in the shade *and* the temperature of the powder in the cartridge. If you leave your cartridges in the sun or in a heated barrel chamber, there may be a small discrepancy with the figures announced.
E: Angle of the site = angle of aim. Important if the target is higher or lower than the shooter. For our example, with 10° of inclination, we have to remove another 2 clicks, which makes us a final total of +98 clicks of elevation.
Warning! The corrections to be introduced are the same if the target is higher or lower than the shooter – whether the angle is positive or negative, the trajectory always goes higher than when shooting flat, and we must click less elevation.
F: Longitudinal wind (front or back). A strong headwind increases the resistance of air (and with a back wind – it’s the opposite). The small dots next to the numbers 2-4-6-8 represent the number of clicks in elevation to be added (for a headwind) or removed (for a back wind) for winds of 2, 4, 6 or 8 m/s.
G: A quarter of the wind rosette, which gives the wind drift in clics for winds of 2, 4, 6 and 8 m/s from 1h, 2h and 3h. The values for the remainder of the dial are symmetrical: for example the drift for winds from 5h are the same as for 1h. The drift from 7h is the same in absolute numbers, but goes in the opposite direction. Etc.
The values for speeds and directions that are not on the table must be approximated between the figures presented.
In our example, the drift for the wind of 5 m/s from 10h is read on the “mirror” scale of 2h, and it corresponds to the average between the drifts for 4 and 6 m/s, i.e. between 19 and 28 clicks: (19 + 28) / 2 = ~ 23 clicks.